Digital.ai Release and Argo CD (1/2)
This article is based on the official documentation and sample article. It’s a version based on minikube rather than on AWS with a step by step approach. The article is divided in two parts:
- the “Continuous Delivery” scenario (this article)
- the “Environment Promotion” scenario
To demonstrate the integration of Digital.ai Release with Argo CD, we are going to implement the “Continuous Delivery” scenario.
If you directly want to show the sample in action check the video first!
The Continuous Delivery Scenario
- The developer pushs a commit on github (by modifying the code app in the
argocd/helloworlddirectory) - A Github action creates a new version of the app and push a new docker image on dockerhub
- Github calls Digital.ai Release (to start a release based on the template ‘Continuous Delivery’) with the new image tag as parameter
- The release clones the repo, creates a branch, does the change in the manifest file (to reference the new image) and merges the code.
- The release then calls Argo CD to sync
- Argo CD syncs the app and deploys the new image in the dev environment.
You may ask:”Why do we need Digital.ai Release in this scenario? We could achieve the same scenario by calling Argo CD from github directly!”
Yes correct. But imagine now that in addition to calling Argo CD you want to notify a group a people, send a notification in Slack or do any kind of action? With Digital.ai Release it’s a piece of cake! You could also integrate manual validation in a minute! (in the Promotion Scenario for example).
Step 1: Preparation
- Fork and clone the repository https://github.com/sblin/release-argo
- Install and configure Argo CD on minikube locally
minikube start -p argo --memory=8192 --kubernetes-version=v1.24.3
kubectl create namespace argocd
kubectl apply -n argocd -f https://raw.githubusercontent.com/argoproj/argo-cd/v2.3.7/manifests/install.yaml
Get the password for the admin user
kubectl -n argocd get secret argocd-initial-admin-secret -o jsonpath="{.data.password}" | base64 -d; echo - To access the ArgoCD dashboard, you can either set a port-forward or patch the service as a NodePort type. Of course these solutions are only for dev/test environments.
– Set the portforward and connect to the Argo CD console http://localhost:8080
kubectl port-forward svc/argocd-server -n argocd 8080:443
– Or patch the argocd-server service to expose the service on a fixed node port and access the dashboard on the node port: https://192.168.56.3:30008/
➜  ~ cat patch.yaml
spec:
  type: NodePort
  ports:
   - port: 80
     nodePort: 30007
   - port: 443
     nodePort: 30008
➜  ~ kubectl patch service argocd-server -n argocd --patch-file patch.yaml
service/argocd-server patched
- Install Ngrok.
Ngrok is used to expose your local release instance to the internet. It’s needed for the github action to connect to your local Release instance.ngrok http 5516Ngrok is great for demo purpose. It’s of course a temporary solution. Each time you start a new session, a new URL is generated; you then need to modify the Github secret.
Step 2: Argo CD configuration
Create 3 namespaces and 3 applications in Argo CD, one per environment (dev, uat, prod).
First login with the client
kubectl create namespace dev
kubectl create namespace uat
kubectl create namespace prod
argocd login localhost:8080
and then create the applications. Do not forget to change the repo!
argocd app create helloworld-dev --repo https://github.com/sblin/release-argo.git --path argocd/helloworld-cd/dev --dest-namespace dev --dest-server https://kubernetes.default.svc --directory-recurse --revision main
argocd app create helloworld-uat --repo https://github.com/sblin/release-argo.git --path argocd/helloworld-cd/uat --dest-namespace uat --dest-server https://kubernetes.default.svc --directory-recurse --revision main
argocd app create helloworld-prod --repo https://github.com/sblin/release-argo.git --path argocd/helloworld-cd/production --dest-namespace prod --dest-server https://kubernetes.default.svc --directory-recurse --revision main
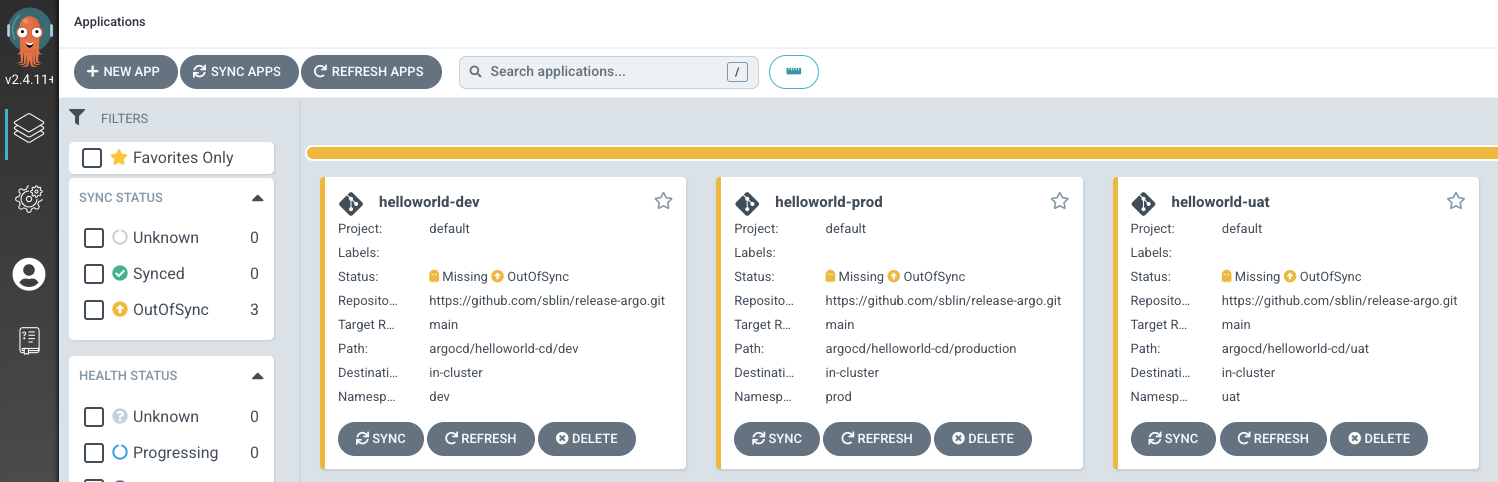
We create 3 applications, one per environment. Each application refers to a separate folder and target a different namespace. Each application reads the corresponding manifest file helloworld.yaml to deploy the application defines as:
containers:
      - name: helloworld-prod-container
        image: samuelblin/helloworld:7d6df2e
Each time a new version of the app is available on dockerhub, the tag is changed in the manifest and Argo CD notified to sync and deploy the new app. It’s the same workflow to promote from one env to the next one: we copy the app tag from the source manifest file env and modify the manifest file of the target env.
Step 3: Release configuration
In your Release instance follow these steps:
- Add a
Github:Serverconnection as below (keep the same title and define a new global variable as in the picture).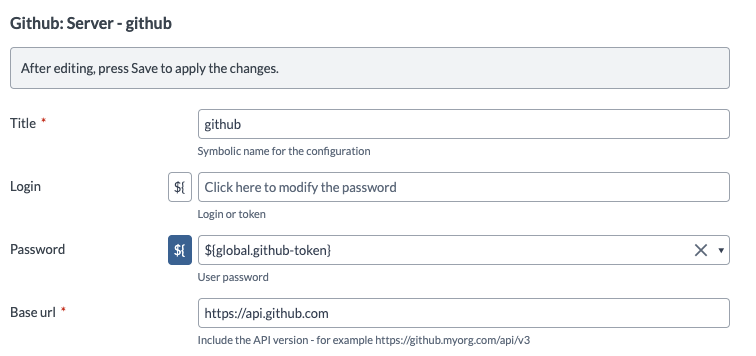
- Add a
ArgoCD:Serverconnection as below (keep the same title and define a new global variable as in the picture).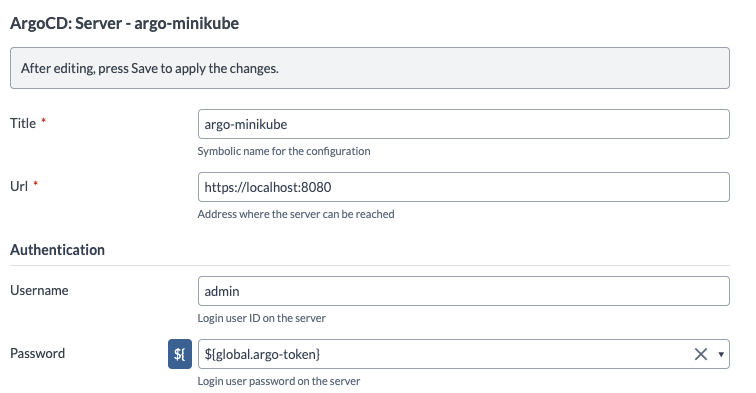
- Create a folder named ‘argocd’
- Modify the file
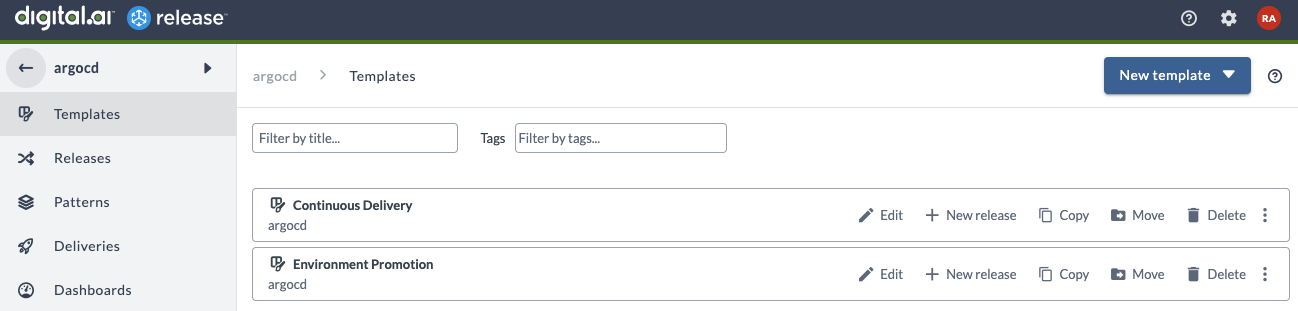
argocd/templates/argocd.yamlto reference you dockerhub repository (replacesamuelblin/helloworldwith your repo in dockerhub) - Import the templates in Release (change the command accordingly to your environment)
xl apply xl-release -f argocd.yamlYou should have 2 templates “Continuous Delivery” and “Environment Promotion”
Step 4: Github configuration
Define the following secrets in your Github repository:
| Name | Value | Note |
|---|---|---|
| DOCKER_USER | samuelblin | Your duckerhub login |
| DOCKER_PASS | ** | Your dockerhub password |
| DOCKER_REPO | samuelblin | Your dockerhub repository |
| DOCKER_REGISTRY_HOST | hub.docker.com | |
| XLR_USER | admin | Admin Release login |
| XLR_PASS | ** | Admin Release password |
| XLR_URL | The url generated by Ngrok |
Modify the file argocd/helloworold/start-release.yaml to set your git URL and your local clone path.
Step 5: First commit!
Modify the file argocd/helloworld/src/main/java/com/dai/helloworld/controller/AppController.java and push the commit.
A new Github action should be fired, a new image pushed to dockerhub and a new release started in Release!
The release should call ArgoCD and the new image should be deployed to the dev environment.
Video
See it in action!!