Digital.ai Deploy Templates - AWS EC2 sample
Prerequisites: Basic knowledge of Digital.ai Deploy and its core concepts.
Check my introduction video first if you are not familiar with Digital.ai Deploy.
Introduction
This article is an introduction to Digital.ai Deploy Templates. Templates are usefull when you do provisioning and dynamically create architecture elements.
In this sample we are going to create an EC2 instance and run a script in this instance to install Ansible.
After the provisioning of the EC2 instance, it has to be declared (as a SshHost item under the Infrastructure hierachy) in Deploy so that Deploy “knows” this new instance.
To achieve this we use Templates: templates are specifically designed to dynamically create new CI.
Let’s see in more details.
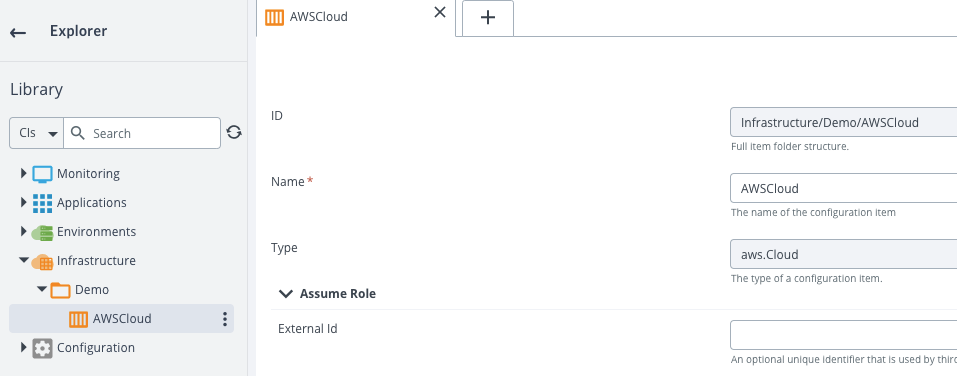
Step 1: Connection to AWS
For our sample we first need to declare a new AWS connection. Create a new “aws.Cloud” item and check the connection before moving forward.
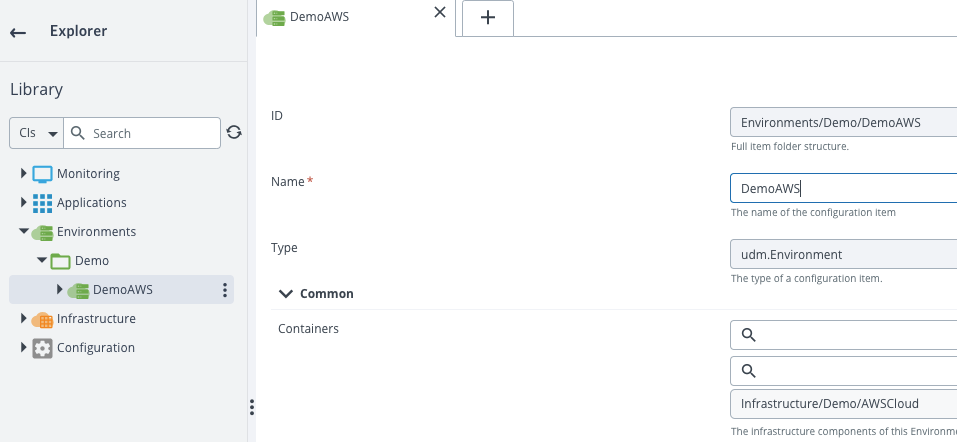
Create an environment and add your AWS connection to it. I intentionally skip the dictionnary here to focus on Templates.
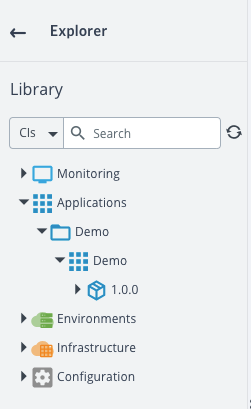
Step 2: Create a new Application and Deployment package
Create a new Application and add a new Deployment package like below:
Step 3: KeyPair and SecurityGroup
Before creating a new EC2 instance, go to your AWS console and create a new KeyPair. I created a new keypair called "xld-keypair". Then save the pem file in a directory on your Deploy machine, accessible by Deploy ("/tmp/xld-keypair.pem" in my case). This pem file will be used by Deploy to connect to the instance.
Be sure to set the correct permissions on your file:
chmod 600 /tmp/xld-keypair.pem
We could have done something more dynamic (by creating the keypair each time) but let’s first concentrate on Templates concepts.
Add a new SecurityGroup in your deployment package with these properties:
| Property | Value | Note |
|---|---|---|
| Name | xld-securityGroup | |
| Security Group Name | xld-securityGroup | same name as the one in AWS |
| Region | eu-west-3 | set your AWS region |
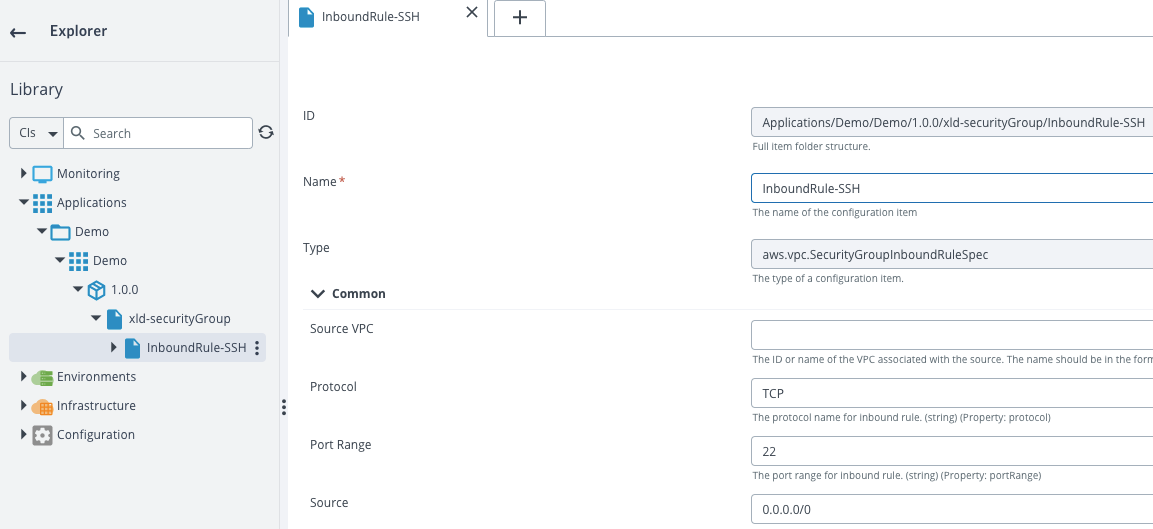
Under your security group add a new inboud rules for SSH with these properties:
| Property | Value |
|---|---|
| Name | InboundRule-SSH |
| Protocol | TCP |
| Port range | 22 |
| Source | 0.0.0.0/0 |
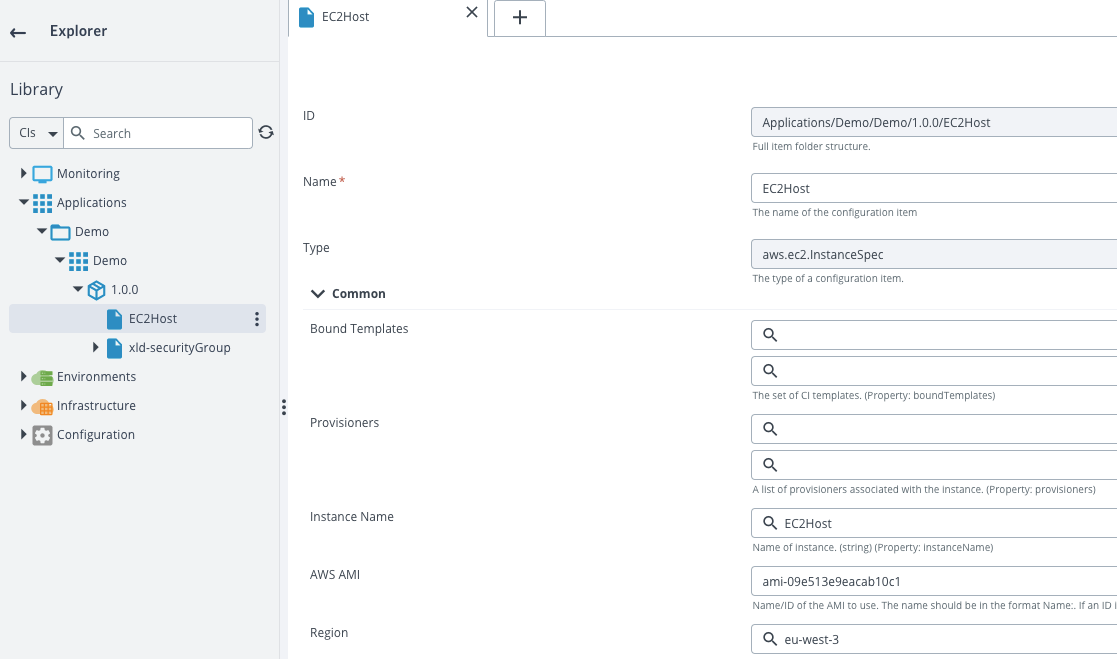
Step 4: Add a new EC2 instance
Add a new AWS EC2 instance definition(aws.ec2.InstanceSpec) in your deployment package with these properties:
| Property | Value | Note |
|---|---|---|
| Name | EC2Host | |
| Instance Name | EC2Host | name of the instance in the AWS console |
| AWS AMI | go to the AWS console and choose an appropriate ami. Be careful that depending of the ami you choose, the user used to connect to your instance may be different than in my sample. I choosed an ubuntu ami. | |
| region | eu-west-3 | set your region |
| AWS Security Group | xld-securityGroup | same as the Security Group Name property of the security group (do not forget to click on the Add button!) |
| Instance Type | t2.micro | |
| AWS key pair name | xld-keypair | same name as your keypair in AWS |
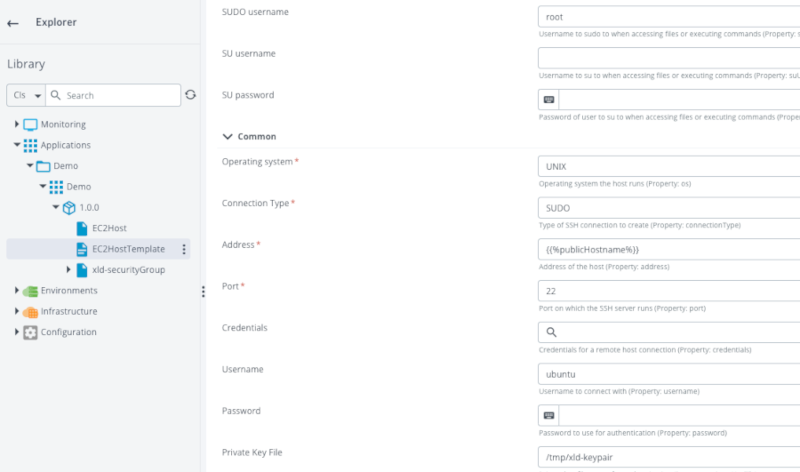
Step 5: add a new SshHost template
After the provisioning of the EC2 instance, to create a new host in Deploy we need to add a SshHost template and link this template to the instance.
Add a new SshHost template (template.overthere.SshHost) in your deployment package and set these properties:
| Property | Value | Note |
|---|---|---|
| Name | EC2HostTemplate | |
| SUDO username | root | |
| Operating System | UNIX | |
| Connection Type | SUDO | |
| Address | {{%publicHostname%}} | This is a Contextual placeholder. The name of the placeholder is the name of the output property publicHostname of the EC2 host definition. |
| username | ubuntu | be careful depends of the AWS ami you choosed |
| Private Key File | /tmp/xld-keypair.pem | set the path to the keypair file saved locally on the Deploy machine |
| Instance Name | Demo/EC2AnsibleHostController | path and name of the item under the Architecture hierachy |
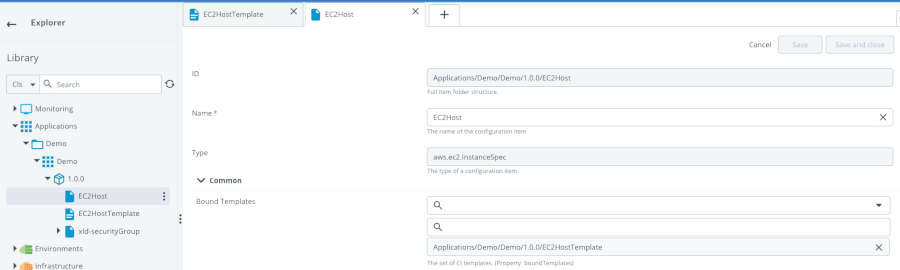
Then go back to the EC2Host definition and add the template in the “Bound Templates” property. This is how we link the template with the EC2 instance definition. It means that after the provisioning of the EC2 instance, a new item of type overthere.SshHost will be created in the Infrastructure directory and the contextual placeholder resolved.
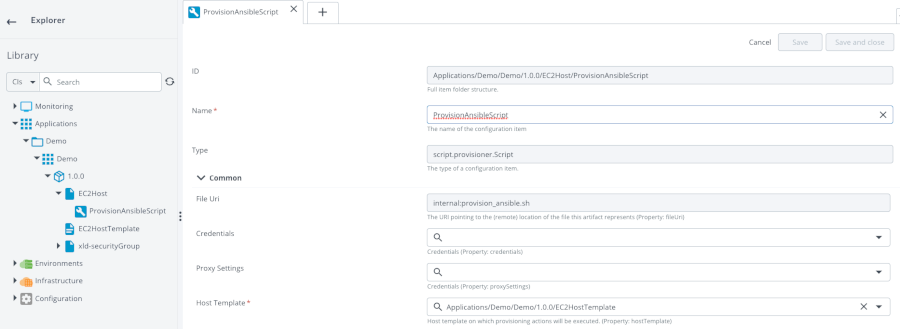
Step 6: add a new provisioner script
Let’s take as a sample that we want to install Ansible on the newly created EC2 instance. The script would be like this:
apt update
apt install --yes software-properties-common
apt-add-repository --yes --update ppa:ansible/ansible
apt install --yes ansible
ansible-playbook --version
echo "-- DONE --"
Save the script in a file “provision_ansible.sh”.
Under the EC2Host definition, add a new provisioner script (script.provisioner.Script).
Attach the previous file in the “Choose file” property and set the “Host Template” property to “Applications/Demo/Demo/1.0.0/EC2HostTemplate”
Step 7: Deployment!
We are now ready for deployment: the deployment of the 1.0.0 package provisions a new EC2 instance, run a script to install Ansible and then define a new SshHost item under the infrastructure directory.
Deploy the Demo application in the DemoAWS environment.
If everything goes well, a new instance should be created in the AWS cloud and a new item SshHost created in Deploy.
To delete your EC2 instance, undeploy the application!
We now have a very convenient way to create a new EC2 instance with Ansible installed. This host could then be used in a more complex scenario to play the role of a “Ansible Controller” machine to provision other hosts. Tha application could then be renamed “ansible-controller-app”
Check this repository for a more complex scenario: Sample