Release Python SDK sample
In this document we are going to use the new Release Python SDK available since version 23.1 and build a plugin that will return the current temperature for a specific location (provided as input properties). Obviously an essential use case ![]()
The official documentation is located here: Digital.ai Release Integration Python SDK Overview
I strongly encourage to go first for the SDK workshop.
Environment:
| Component | Version | Note |
|---|---|---|
| Digital.ai Release | 23.1.0 | Release running on my laptop, port 5516 |
| Docker Desktop | 4.19.0 | Docker desktop running on my laptop |
| k8s | 1.26.2 | k8s cluster (2 nodes) running on my laptop (see my article for installation) |
| Remote runner | 23.1.0 | A Release remote-runner installed in my k8s cluster (see my article for instructions) |
| python | 3.8.5 | python 3.8.5 installed on my laptop |
| VSC | 1.78.2 | Visual Studio Code is my preferred IDE |
Introduction and Objective
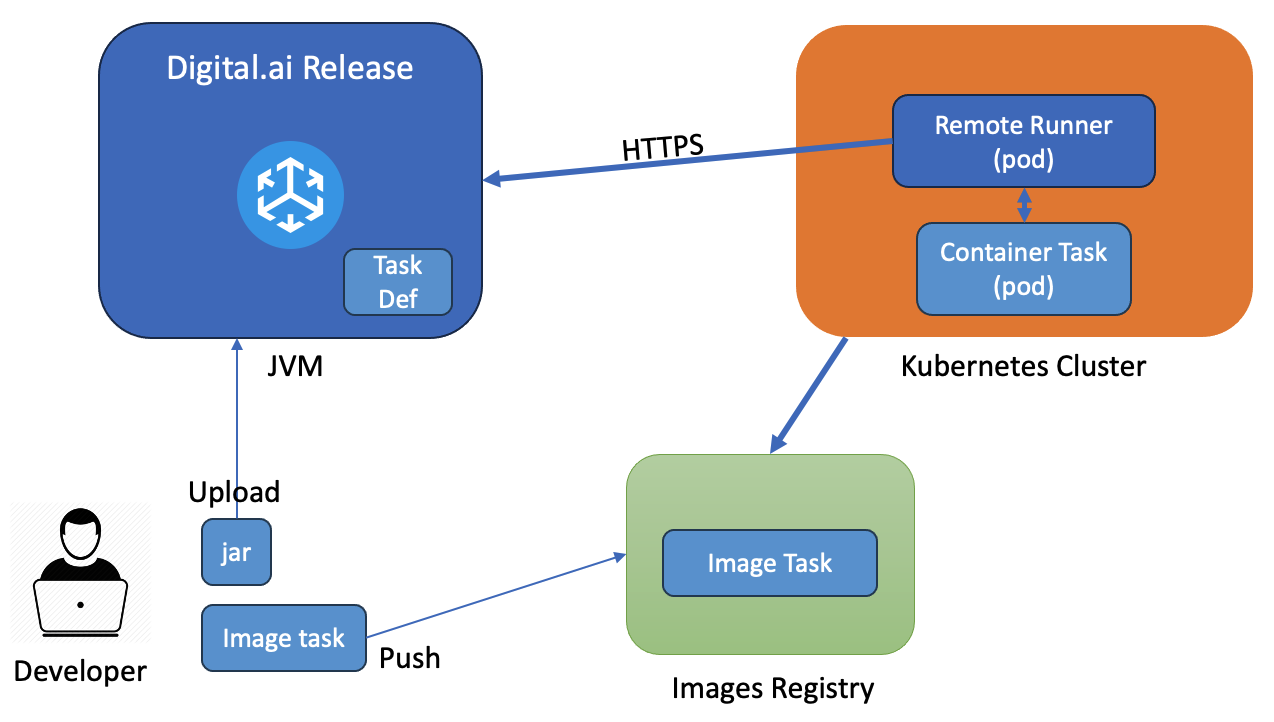
Initially these components are running on my laptop:
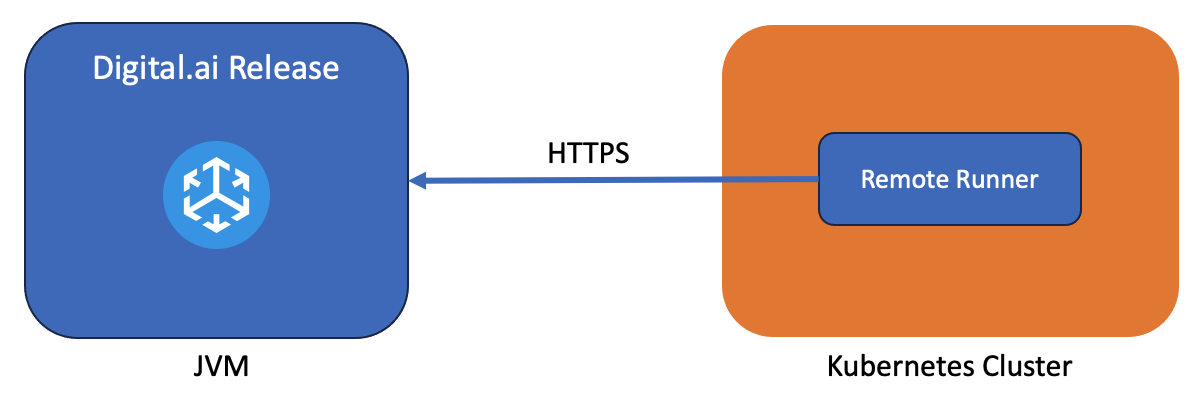
What we want to achieve is:

We then need to build two components:
- A task def: it’s actually the same type of packaging as traditional plugin, a jar file uploaded in Release that contains the definition of the task (not the implementation!) When we’ll use the task, the Remote runner will be associated via “capabilities” as a destination for the execution of the task.
- A Container Task that runs the code of the task.
The remote runner will create a new pod with an image extracted from a registry. We then need to add a registry to host the image for the container task. From a developper perspective we have these components in place:
Step 2: Preparation
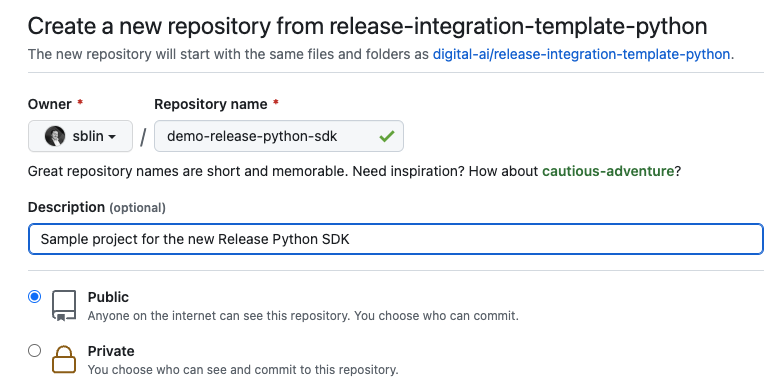
Create a new git repository by using the template located at : https://github.com/digital-ai/release-integration-template-python. This template contains everything needed to build a new docker image task and do a local test. We may not use all its capabilities from a developer perspective in this document as we are going to use a local k8s cluster to run the Container Task.

Step 3: Setup
Clone the repository
The sample project is a skeleton project to create a plugin. Clone the project locally and open Visual Studio Code. All the terminal commands are executed from the Visual Studio Code terminal.
Create a Virtual environment
venv is the standard tool to create virtual environment for Python. It’s included in Python version 3.3 (starting with 3.4 pip is also included with Python.) venv enables to install dependencies only for the current project rather than for the whole system.
The command to create a virtual env is python -m venv <DIR>
python -m venv venv
A new venv directory is created. To activate the new virtual environment execute the command source venv/bin/activate.
You sould be now in the virtual environment. To exit the env run the deactivate command:
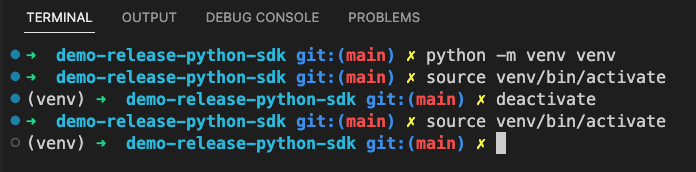
In the next steps be sure to execute the python commands in the virtual environment.
Required librairies
The requirements.txt file contains all the dependencies for your project. By default 2 librairies are already set:
- digitalai-release-sdk == 23.2 1: Release Python SDK
- requests >= 2.28.1: HTTP library
For the demonstration we keep these two librairies.
Install the dependencies:
(venv) ➜ demo-release-python-sdk git:(main) pip install -r requirements.txt
TIP: Check the venv/lib/python3.8/site-packages directory to get an overview of the Digital Release SDK content.
Build a local Docker Registry
We are going to build a local Docker Registry accessible using HTTPS (this is required as the cluster connects to the registry only in HTTPS.)
Let’s first create a self-signed certificate and a private key for the registry: create a certs directory in the project root folder. In the certsfolder create a file extfile.cnf like:
[ req ]
prompt = no
distinguished_name = dn
x509_extensions = x509_ext

[ dn ]
CN = exemple.com
emailAddress = ssl@exemple.com
O = Company
OU = Department
L = Town
ST = State
C = EN

[ x509_ext ]
subjectAltName = IP: 10.0.2.2 # change the IP as per your configuration. This is the IP of the HOST as
                              # seen from the cluster node (the remote-runner).
                              # This is mandatory to allow connections from the cluster.
Generate a self-signed certificate and a private key like:
openssl req -x509 -sha256 -nodes -days 365 -newkey rsa:2048 -keyout privatekey.key -out certificate.crt -config extfile.cnf
Go back to the project root and start the registry:
docker run -d \
  --name registry \
  -v "$(pwd)"/certs:/certs \
  -e REGISTRY_HTTP_ADDR=0.0.0.0:443 \
  -e REGISTRY_HTTP_TLS_CERTIFICATE=/certs/certificate.crt \
  -e REGISTRY_HTTP_TLS_KEY=/certs/privatekey.key \
  -p 443:443 \
  registry:2
The Registry runs on my local host on port 443. To be referenced from another Docker Container we have to use the special host.docker.internal name (we could simplify using services and a docker compose but let’s do like this).
Start an interface for the Registry:
docker run -d \
  --name registry-ui \
  -e REGISTRY_HOST=host.docker.internal \
  -e REGISTRY_PORT=443 \
  -e REGISTRY_PROTOCOL=https \
  -e REGISTRY_ALLOW_DELETE=true \
  -e SSL_VERIFY=false \
  -p 8080:80 \
  parabuzzle/craneoperator:latest
Check that you can connect. If the connection to the registry is successfull, you should get an empty registry:
![]()
The certificate must be installed on the platform where k8s is running otherwise the connection will be impossible.
Connect to the k8s worker node of the k8s cluster and install the certificate (in my case I copied the certificate in the /usr/local/share/ca-certificates folder and ran the command sudo update-ca-certificates to install the certificate)
Set the project properties
The project.properties file contains information that will be used during the build phase of the plugin (jar and Image). Note that the REGISTRY_URL is defined as seen from the k8s cluster perspective. In the project template the registry is running as a docker container on the port 5050. The LOCAL_REGISTRY_URL key is not set by default: it’s the URL of the registry as seen from the local dev environment (in my case 127.0.0.1): it’s used with the push command to add the image in the Registry.
PLUGIN=demo-release-sdk-plugin
VERSION=0.0.1
REGISTRY_URL=10.0.2.2:443
LOCAL_REGISTRY_URL=127.0.0.1:443
REGISTRY_ORG=sblin
Step 4: Start coding
The python source code for the plugin is in the src directory. Remove all existing files and create a temperature.py file to get the temperature for specific location:
1
2
3
4
5
6
7
8
9
10
11
12
13
14
15
16
17
18
19
import requests
import json
from digitalai.release.integration import BaseTask
class Temperature(BaseTask):
def execute(self) -> None:
latitude = self.input_properties['latitude']
longitude = self.input_properties['longitude']
url = "https://api.open-meteo.com/v1/forecast?latitude=" + latitude + "&longitude=" + longitude + "¤t_weather=true"
self.add_comment(f"Sending request to {url}")
r = requests.get(url)
if r.status_code == 200:
obj= {}
obj = json.loads(r.text)
self.set_output_property('temperature', obj['current_weather']['temperature'])
self.set_output_property('time',obj['current_weather']['time'] + '(' + obj['timezone'] + ')')
Modify the resources/type-definitions.yaml file to define the Task:
1
2
3
4
5
6
7
8
9
10
11
12
13
14
15
16
17
18
19
20
21
22
23
24
25
26
27
28
29
30

types:

  demoTask.BaseTask:
    extends: xlrelease.ContainerTask
    virtual: true

    hidden-properties:
      image:
        default: "@registry.url@/@registry.org@/@project.name@:@project.version@"
        transient: true
      iconLocation: test.png
      taskColor: "#667385"

  demoTask.Temperature:
    extends: demoTask.BaseTask
    description: "Simple Task to get current temperature for a specific location"

    input-properties:
      latitude:
        description: The latitude
        kind: string
      longitude:
        description: The longitude
        kind: string

    output-properties:
      temperature:
        kind: string
      time:
        kind: string
Step 5: Build the jar, the image and publish it to the Registry
Modify the build.shfile to use the $LOCAL_REGISTRY_URL variable (as set in the project.properties files):
1
2
3
4
5
6
7
8
9
10
11
12

build_image(){
  # Build docker image and push to registry
  if docker build --tag "$LOCAL_REGISTRY_URL/$REGISTRY_ORG/$PLUGIN:$VERSION" .; then
    if docker image push "$LOCAL_REGISTRY_URL/$REGISTRY_ORG/$PLUGIN:$VERSION"; then
      echo "Build and push completed: $LOCAL_REGISTRY_URL/$REGISTRY_ORG/$PLUGIN:$VERSION"
    else
      echo "Push failed for $LOCAL_REGISTRY_URL/$REGISTRY_ORG/$PLUGIN:$VERSION"
    fi
  else
    echo "Build failed for $LOCAL_REGISTRY_URL/$REGISTRY_ORG/$PLUGIN:$VERSION"
  fi
}
Run the following command to build the jar, build the image and publish the image in the registry:
sh build.sh
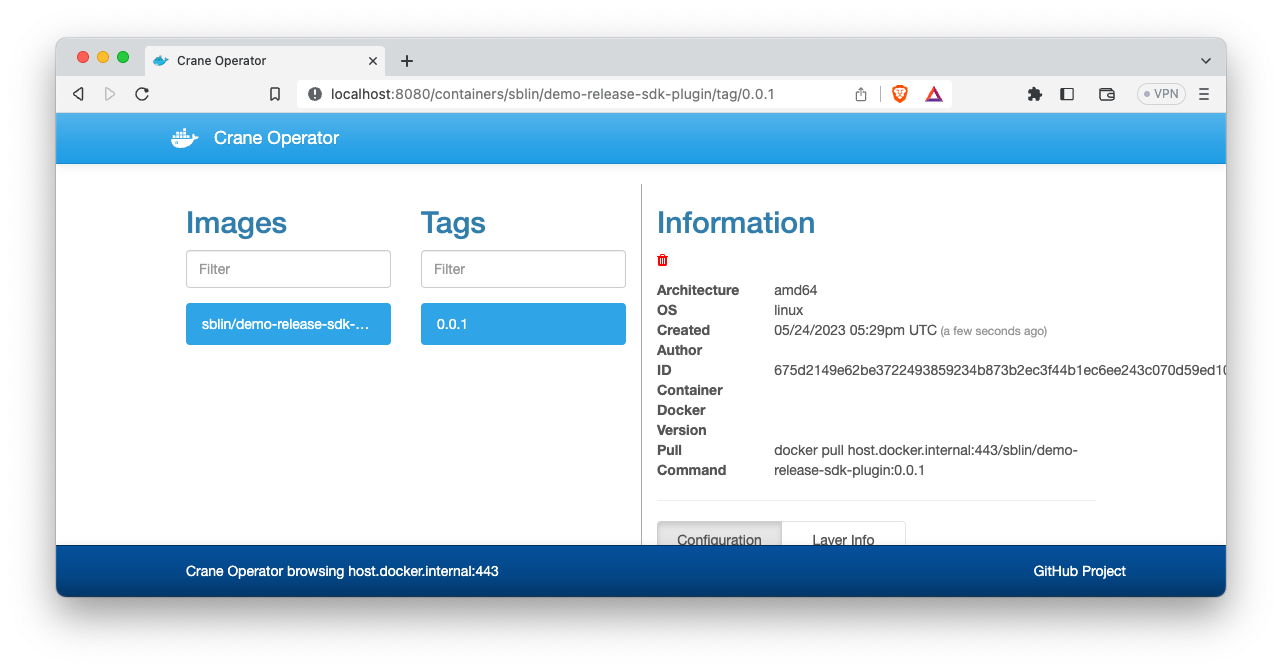
If everything works well the image is pushed in the registry. Refresh the registry UI to get the details of the image:
Step 6: Test the new task!!
Upload the new plugin into Release and restart Release (file build/demo-release-sdk-plugin-0.0.1.jar).
Create a new Template and a release with the new Task:
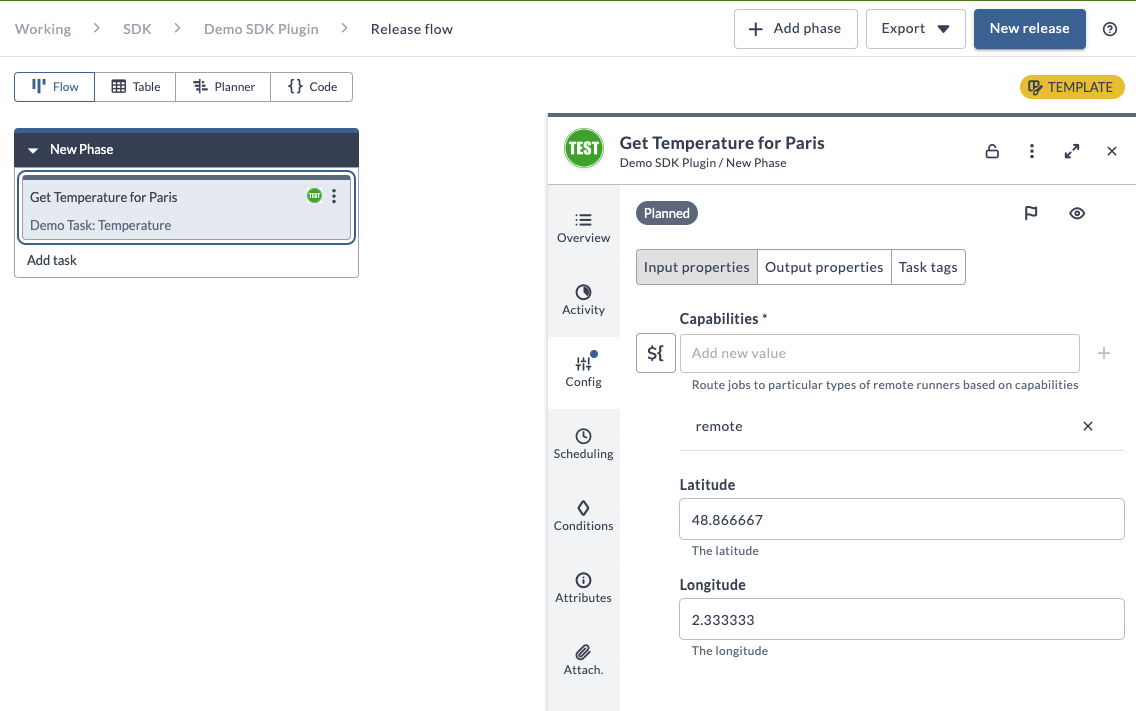
The task expects two input parameters of type String with a decimal format. Visit the site https://www.latlong.net to get the latitude and longitude for your preferred city.
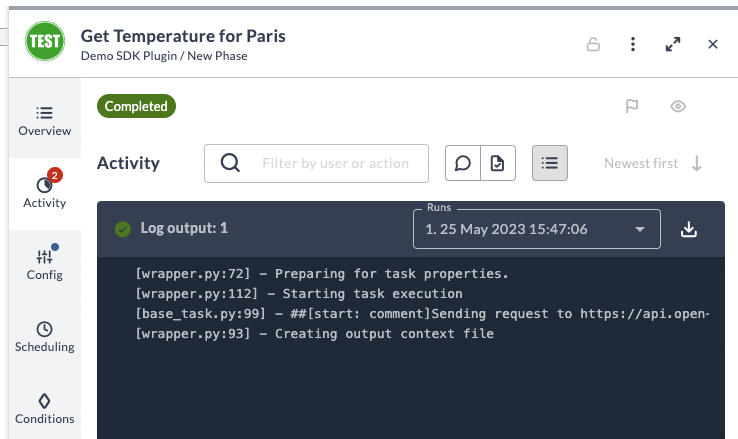
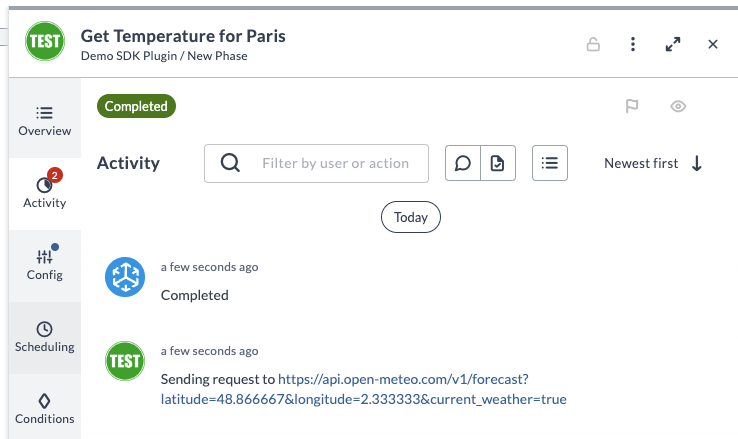
As soon as you execute the task, a new pod is created in the cluster, based on the image retrieved from the registry, and then execute the code task. It’s destroyed when the task execution is completed.

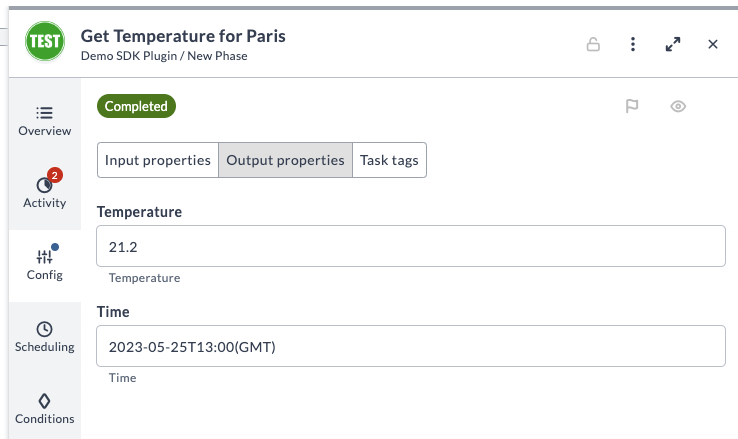
Check the task activity to get the comment, the log and the output properties:
To get the code for my sample go to the repository.